
In one line: you earn size back one rung at a time. Each rung opens on process evidence, demotion is faster than promotion, and how much you're still down gets no vote.
Lesson 18 of the 30-part Trading Decisions course. By Eliza.
Lesson map
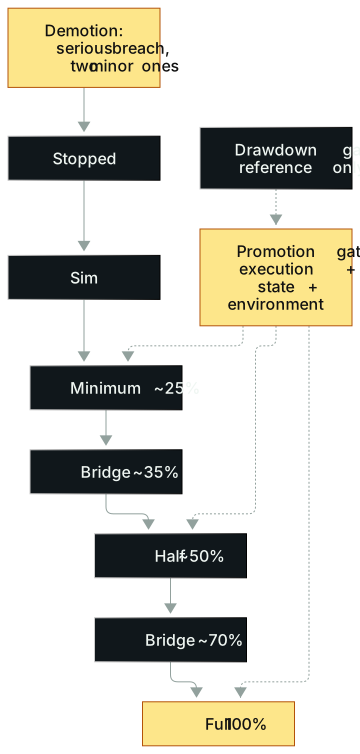
In words: (1) Size comes back on a ladder: stopped, sim, minimum (about 25% of normal), a bridge step (about 35%), half (about 50%), another bridge (about 70%), then full size. (2) Every step up passes the same gate, which checks only three kinds of process evidence: clean execution, a stable state, and a market that still fits the strategy. (3) How far you're still down is a reference for the gate, never a pass on its own. (4) Demotion triggers are separate and faster: a serious breach sends you back to sim or stopped, and two minor ones drop you a rung.
Opening: one contract and a $250 lock
The founder of a futures prop evaluation firm took a classic wrong turn when he was young. From his late teens into his early twenties he ran a small business on the side and traded, and he blew through three real-money accounts of a little over $20,000 each. His later summary: the more he knew, the less money he had.
Then he joined a prop shop in Chicago. The rules were almost insultingly small. One contract only, and sim first. During the trial he had to average about $250 a day while never touching a $250 daily loss line. Touch it once and the trial restarted.
He pushed back right away. One contract? I've traded way bigger than that. The answer was just as blunt: you're sitting here because you want someone else to fund you. If you traded your own money well, you wouldn't be here.
He later admitted that small rule was what finally taught him what sim is for. In a room of fifteen or twenty people, he watched how angry traders got when they burned through their allowance, and he learned one thing for good: touch the line and you're locked, no discussion.
That story has the three pieces this lesson builds:
- One contract plus sim is the bottom rung.
- A loss line that locks you out is the demotion mechanism, and it doesn't depend on willpower.
- Restarting the trial after a lock turns stepping back into a rule instead of a mood.
He also had a line worth keeping: he would never fly with a pilot who couldn't handle the flight simulator.
Now look again at the small-cap short seller from Lessons 16 and 17. He lost about $350,000 on TOP in a day, sized up and made about $55,000 the next day, then lost about $80,000 the day after before calling it. What he lacked were exactly those three pieces: no bottom rung, no automatic lock, no restart. He relied on stopping himself on day three, and by the time most people stop themselves, the hole is deeper again.
The idea
A smaller gap is not a hall pass
The most common scene after a drawdown goes like this. You're down $17,000, you win some back, you're still down a bit over $10,000, and you start to feel fine. Size and habits quietly drift back to normal, and you fall back in.
The mistake is treating the shrinking gap as evidence. The gap is a result, and results mix three things: the method's expectancy, your execution over those days, and random variance (Lesson 1). Going from $17,000 down to about $10,000 down could mean execution really improved. It could be luck. It could be that you quietly sized up and got paid once. The account can't tell them apart.
So size permission has to come from process evidence. P&L is a lagging indicator. If you skipped the daily scorecard for six months, two nights of catching up won't bring the money back. Put in the work consistently and results show up later.
That's the same line as Lesson 1: making money can still be a violation. People in drawdowns are the easiest to fool with that kind of profit, because they want to believe it most.
Rushing to fill the hole keeps you in it longer
There's an old trading saying: try to make it back fast and it takes forever; make it back slowly and it's over surprisingly soon. Plenty of people have heard it. Few act on it, for two reasons.
The first is risk. Drawdown losses often come from fighting the trend or failing to adapt (Lesson 17). Sizing up before you've found the leak is hooking a leaky bucket to a bigger hose.
The second is psychological. I call it despair math: if I cut size this much, won't it take 150, 250, 400 days to get back? It looks rigorous, but it swaps the premise and treats cutting size as a life sentence. Smaller size doesn't mean forever, and you don't have to earn it all back on the kind of trade that lost it.
The fix is to cut the gap into bites. Down $6,000? Don't stare at $6,000. Think about the next $500, then a green week, then three green days in a row. Get each small step clear, and when you hit one, celebrate in a healthy way. Healthy means an early night, not a bar tab.
How big each step can be
The part of staged recovery that most needs numbers is step size.
A good rule of thumb: never raise risk so much that a loss would damage your state and your feedback loop, and never so much that it changes how you execute the trade. What really knocks people down is doubling, tripling or quadrupling risk. The 40% and 43% steps below are the arithmetic of this example, not a tested limit on what a person can absorb.
The gym makes this obvious. If your max bench is 80 kg, loading 160 hurts your shoulder, not your character. You go 80, then 81.25, then 82.5, and let small increments compound. Everyone gets that in the gym. In trading it turns into "let's triple the risk," followed by "why did I get hurt?"
Run the numbers. Raise risk 5% every two weeks and do it 26 times in a year: 1.05 to the 26th power is about 3.56, so you end the year at three and a half times where you started. Nobody panics going from $200 to $210. The steps are tiny, and enough of them make a staircase.
In recovery, that means you climb from minimum to full size in small steps and never in one jump.
Size is also physical
Lesson 16 covered reading size through your body. Going from a little over $9,000 to $10,000 risk feels tense but manageable. Jumping from $10,000 straight to $20,000 brings an instant sweat, even in places that never sweat. That's your body voting early: if this one loses, you can't take it.
Build that into the ladder. Each rung should list not just a number but what your body and mind should feel like at that rung. If you're sweating, hesitating and refreshing P&L at minimum size, you haven't earned the next rung, and your minimum may not be small enough.
The method
Step 1: Pass three gates before the ladder
- Survival and state. Are living money and trading money separate? Any debt, margin calls, or pressure to make money right now? Insomnia, despair, inability to stop? Trading stress is real, and a big loss can be genuinely traumatic. If any of this applies, the ladder doesn't, and you stay stopped. Get professional help if you need it. There's no shame in it.
- Execution. Is the recent record complete? Did entries, stops, size and exits all follow the pre-set rules? Profitable violations still count as violations.
- Strategy and environment. Did the losses come from normal variance, a regime change, strategy decay, or a bad definition? If the current market offers nothing that fits, a compliant "no trade" counts as evidence too (Lesson 21).
Step 2: Draw five tiers
These are my own example numbers, there to show the structure. Adjust them to your account and tolerance:
| Tier | Risk vs. normal | What's allowed | Notes |
|---|---|---|---|
| Stopped | 0 | No live trading | Review the incident, check funds, assess state |
| Sim | 0 | Replay or sim | Verify only recognition, stops and exits |
| Minimum | ~25% | The most familiar setup from the drawdown playbook (Lesson 17) | No overnights, no high-variance or illiquid names |
| Half | ~50% | Keep the drawdown playbook. A new strategy opens its own observation period | Watch whether bigger size distorts behavior |
| Full | 100% | Every compliant setup in the playbook | Back to the pre-set base risk, not "make-up" sizing |
Two additions.
Put bridge steps between tiers. Going from 25% straight to 50% is a double, and almost nobody adapts to a double comfortably. So add a 35% step between 25% and 50%, and a 70% step between 50% and 100%. Each raise is then about 40%: 25 to 35 is 40%, 35 to 50 is 43%, 50 to 70 is 40%, 70 to 100 is 43%. These are the arithmetic steps of this example, not a tested safety threshold. If a step is more than you can handle, split it finer. What you can absorb is your own boundary.
Change one variable at a time. On the day you move up, don't add a strategy or extend hold times. Change three things at once and you can't tell which one helped or hurt.
Step 3: Write a card for each tier
Each tier gets four things:
- Promotion evidence. A run of trades with complete records, zero serious violations, pre-entry risk verifiable on every trade, only allowed setups, a stable state, and an environment that matches the strategy's sample. Set the trade count by your frequency. Low-frequency strategies need longer observation.
- Minimum observation. Counted in trades, not calendar days. Two weeks with no qualifying setups doesn't earn promotion because "it's been two weeks."
- Demotion conditions. Faster than promotion. See Step 5.
- Who enforces it. A daily loss limit is best enforced by your broker or platform, so you can't override it in the moment and your worst self can't get at the account. If that's not possible, have a second person who knows your tier and has the right to demand you step down.
Step 4: Green days and the gap are the fourth item
Plenty of recovery rules read "three green days in a row and the daily stop goes back up," or "once the gap narrows to $3,500, go back to normal" (numbers that match Lesson 16's example ladder). Those are fine, but only stacked on top of process evidence, never instead of it. Rule-breaking profits can make your green-day count look great.
So this lesson's promotion gate requires all three kinds of process evidence at once: execution, state, environment. Green days and the gap are a fourth item, for reference.
Step 5: Demote faster than you promote
Go up slowly, come down fast:
- Pulling a hard stop, trading past the daily limit, hiding records: straight back to sim or stopped.
- Two minor process violations: down one rung.
- A losing streak alone doesn't trigger demotion. But if losses run beyond the strategy's historical range, freeze promotion and re-diagnose.
Step 6: One recovery card
Some traders keep an index card on the desk with four grades, A, B, C and D, where D means no trade, and the risk for each grade written on it. To raise size, they change the card first and then read it every day. Just having to grade each trade forces an extra second of thought mid-session.
In recovery, turn it into a recovery card: current tier, per-trade risk at this tier, the promotion checklist, the demotion triggers. Read it before the open, then open the platform.
More real cases
A 100% jump: one step forward, two back
A senior swing trader set his risk tiers at the start of 2025: about $6,500 for a regular B trade, around $10,000 for A, and about $34,000 for A+. He reviewed monthly, and once the new tiers held, every tier moved up the next month.
The trouble was A+. A+ setups come one to four times a year, so he never got to practice the middle steps. On a Circle (CRCL) trade, his A+ risk went from the roughly $34,000 he could handle to about $68,000, with none of the steps in between tried. His own verdict was that he hadn't built the emotional and psychological footing, and he made a mess of it.
Afterward he didn't push A+ to the high sixties. He moved it only from about $34,000 to a bit over $40,000. One step forward, two back.
The useful part is the diagnosis that followed. Almost nobody adapts comfortably to a roughly 100% jump. The more common result is that people take a big loss because their execution warps, then draw the wrong conclusion: "Sizing up isn't for me." The right conclusion is that the step was too big.
In recovery terms, low-frequency big setups are the wrong place to practice promotion because you get no reps. Practice each rung on high-frequency, low-variance trades (Lesson 17's drawdown playbook), and save the rare big setups for after you're back at full size.
Steps so small they're funny, and they still stall
The same trader's routine is worth a look. Monthly review, and if the tier held, about $600 more on regular trades, roughly 10%, with A and A+ scaled to match.
He knew his own weakness: after a good month he'd get lazy about pushing the next one. For two years none of his tiers moved, until a conversation with a peer got him going again. He'd also once designed more than a dozen ways to adjust risk by setup, so complicated he couldn't run it, and finally cut it down to four letters: C, B, A, A+.
Two lessons for the ladder. First, set each rung's observation period and review date in advance and put them on the calendar. Recovery, like growth, tends to stall on one rung. Second, fewer tiers are easier to run. Five tiers plus two bridge steps is already the limit.
One share: show the pressure out
When the rules are clear and you still hesitate, it's usually a confidence problem or attachment to the outcome: fear of losing, fear of being wrong. The plainest fix is to drop to one share per trade and focus only on execution. The goal stops being money and becomes removing the pressure you put on yourself. Once you execute cleanly without stakes, add size back slowly.
It can be very concrete. Someone used to $150 of risk per trade will freeze with a hand on the mouse at $400. That's normal. Get used to $180, then $220. Musicians get nervous on big stages and rely on muscle memory, and muscle memory gets built one small gig at a time.
That's what the sim and minimum rungs are for: isolate execution and practice it, and put the money later.
Where full size sits depends on your zero
The small-cap trader from Lesson 16, who took a few thousand dollars to seven figures over five or six years, says it took him three or four years to become consistently profitable. With an account of two or three thousand, he pulled out every bit he made, so the account couldn't grow. Even at a few tens of thousands, he still withdrew every dollar. He'd felt the dangers of trading, financial and emotional, and wanted a safety net first. Only after someone pointed out that he'd never compound that way did he let the money roll.
He also said he had never traded with seven figures of capital. The money he put into each trade stayed in the range of one to three tens of thousands.
Nobody watching called that a mistake. If you grew up with nothing and knew hunger, safety matters more than anything, and you'll never want to risk going back to zero. His later way of putting it: his zero today isn't the zero from all those years ago. Once his floor rose, he could take the risk a better approach demanded.
That fills a gap in the ladder: full size isn't a fixed point. Your background and the floor you can accept decide what "back to normal" means. So the recovery protocol needs a line saying full per-trade risk is the amount at which, in a normal state, you can take several losses in a row and still execute normally. Don't borrow someone else's number.
Common mistakes
1. Using the gap as the promotion rule. "Win back half and return to full size" is the most common recovery rule and the most dangerous. Fix: promotion goes on execution evidence, and the gap is reference only.
2. Jumping straight back. About $34,000 to about $68,000 in one go, a mess, and the wrong lesson that sizing up isn't for you. Fix: keep each raise around 40%, with bridge steps between tiers.
3. Reading one green day as proof. About $55,000 made one day, about $80,000 lost the next. Fix: promote and demote on pre-written evidence, never on a single day's P&L.
4. Changing several things at once. Moving up and adding a strategy and longer holds on the same day means you can't find the cause when it breaks. Fix: one variable at a time.
5. Treating sim profits as live skill. Sim has no real-money pressure, so it can verify recognition and exits but can't prove you'll execute under stress. Get it right without pressure first, then add pressure slowly, never the reverse. Fix: write sim promotion as "actions compliant," not as a profit target.
6. Forcing trades to fill the count. No qualifying setups, but you trade because "I'm a few trades short of the observation period." Fix: count in trades, but never manufacture trades. No setups means a longer observation period, with compliant no-trade days logged (Lesson 21).
7. Writing only the cut, not the climb or the drop. Many people's post-drawdown plan is one line: "halve size." They end up stuck at half for months, or flip everything back on a good-mood day. Fix: every rung gets promotion evidence, minimum observation, demotion conditions and an enforcer.
Where this applies
The ladder fits when the strategy and the sample are still sound and the problem is the account or your state. If the losses come from a strategy that has stopped working (Lesson 27), smaller size won't save it. Replace the strategy first.
If life pressure is heavy, like needing trading income to pay bills, any rung can become a burden. People who live off trading have a completely different risk tolerance. Their full size is much lower and their compounding much slower. Build income outside trading first.
If you notice adding you can't control, persistent insomnia, intense despair, or being unable to stop, the ladder doesn't apply. Stop and get professional support.
Swing traders use the same structure with much longer observation periods, spacing rungs by holding period rather than by days.
Forex and CFD traders can build the ladder directly in lots: say 1 lot normal, 0.25 at minimum, 0.35 at the bridge, 0.5 at half, then 0.7. Check the platform's minimum lot and step first, or your rungs will be forced bigger than planned. In a leveraged account, put each rung's margin use and distance to liquidation on the recovery card too.
Practice: write a two-way recovery protocol
Material: recent records from one of your strategies. If you don't have them, use the small-cap short seller from the opening: assume he started writing a recovery protocol on the day of the TOP loss, and you're writing it for him. Any field without data gets "no data." Don't make it up.
Steps:
- Draw five tiers, with a bridge step between 25% and 50% and between 50% and 100%. In this example each step between nonzero tiers is a raise of about 40% to 43%, not a claim that 50% is a size everyone can absorb. Use a smaller step if you need one.
- Fill six fields per rung: risk vs. normal, allowed setups, promotion evidence, minimum observation in trades, immediate demotion conditions, and who enforces it.
- Write a one-page recovery card you can read before the open.
- Handle three scenarios in 100 words or fewer each:
- Seven compliant trades in a row, net −1.8R. Promote?
- Three winners, one of which had its stop moved out to widen risk. Promote?
- Two weeks with no qualifying setups, and every "no trade" call followed the rules. How do you log it?
- Test your protocol against the prop firm's rules from the opening. Which line is your "one contract," which is "touch the line and lock," and which is "restart the trial"? Add whatever is missing.
- Name the line in your protocol that exists to stop the you who wants to fill the hole fast.
Scoring (out of 14):
- 3 points: all five tiers, with the example's arithmetic steps rather than a 50% safety rule, and a separate entry rule from sim to the first live tier.
- 3 points: promotion evidence is observable, with nothing like "feels stable."
- 3 points: demotion is faster than promotion, with an enforcer named, a second person or the platform.
- 2 points: results and process are kept apart.
- 2 points: periods with no setups are handled.
- 1 point: strategy and state boundaries are both written.
A protocol that lets one big win skip rungs, or lets the gap stand in for process evidence, fails.
Reference answers: Scenario one: don't reject on −1.8R alone or approve on "all seven compliant" alone. First check whether −1.8R falls within this strategy's normal range over seven trades, then confirm the seven meet the pre-set count, state and environment conditions. If they do, promote. If not, extend observation. Scenario two: no promotion. Moving a stop out is a serious violation and sends you straight back to sim or stopped, and three winners don't offset it. Scenario three: log the compliant no-trade calls as screening evidence, with the reason for each day. Observation extends, but calendar days can't replace the trade count, and you never force trades to fill it.
Before you write the protocol, use the Loss Recovery Calculator to see how much your current drawdown needs to recover. Then use the Position Size Calculator to turn each rung's per-trade risk into shares or contracts. Finally, run the Monte Carlo Simulator at minimum-rung risk with your win rate and payoff to see how wide the account's range gets over a few dozen trades, so normal swings don't get read as promotion or demotion signals.
Tools you can use
- Loss Recovery Calculator: how much you need to make to recover a given drawdown.
- Position Size Calculator: turn each rung's risk into shares or contracts.
- Monte Carlo Simulator: see the range of outcomes over dozens of trades at each rung's risk.
How this connects
- Upstream: Lesson 16 stops the bleeding first. Lesson 17's drawdown playbook is what you trade at the minimum and half rungs. Lesson 14's daily, weekly and monthly limits are the outer edge of every rung.
- Parallel: Lesson 13 covers how a rung's numbers come from per-trade risk. Lesson 15 covers sizing up from a normal state. This lesson covers earning permission back after losses.
- Downstream: Lesson 19 explains why people facing a gap always want to skip rungs. Lesson 24's scorecard supplies daily promotion evidence. Lesson 29's 60-day plan puts the ladder on dated milestones.
Practice this lesson in NQ Replay
Practice each stage of the rebuild in simulation, starting with MNQ, and move up only when that stage's review criteria are met. NQ Replay is our own app for practicing on past NQ futures sessions, replayed tick by tick in simulation, with bracket orders, prop-style loss limits and per-trade review. You can request a free 7-day trial; you'll need your own licensed NQ tick data.
Previous and next
For educational purposes only. This is not financial advice and makes no promise of returns. Tickers, dates and market moves in real trade examples come from public sources. Individual P&L and record figures have been adjusted. Illustrative figures are the author's own. Trading involves risk of loss.
Test it in the calculator
See how deep the hole is before you climb
After a 25% drawdown, how much do you need to make to get back to even?
Example: down 25%, you need about 33.3% to recover; down 40%, about 66.7%. The bigger the gap, the worse the idea of jumping straight back to full size.
Open the Loss Recovery Calculator